こんにちは。新人プログラマーの岩本です。
今回はSwiftUIで検索バーを自作する方法を紹介します。
SwiftUIではUISearchBarに当たるViewが用意されていません。
searchableがありますが、制約が多いので今回は自分でカスタマイズする方法を紹介します。
ぜひ最後までご覧ください。
実装環境
- 言語…Swift 5.8.1
- OS… macOS Ventura 13.1
- アプリ… Xcode 14.3.1
SearhBarを自作する
今回の成果物はこんな感じです。
普通に文字が入力できて、右のボタンを押すと削除されるようになっています。
以下はソースコードです。
SearchTextField.swift
import SwiftUI

struct SearchTextField: View {
    @Binding private var text: String
    private let placeholder: String
    private let updateHandler: (String) -> Void
    private let commitHandler: (String) -> Void
    private let clearButtonHandler: (() -> Void)?
    @Binding var hasFocus: Bool
    @FocusState private var isFocused: Bool

    var body: some View {
        HStack {
            icon
            textFields
                .frame(height: 52)
            clearButton
        }
        .padding(.trailing, 4)
        .padding(.leading, 8)
        .overlay {
            RoundedRectangle(cornerRadius: 4)
                .stroke(.gray, lineWidth: 1)
        }
    }

    private var icon: some View {
        Image(systemName: "magnifyingglass")
            .renderingMode(.template)
            .resizable()
            .scaledToFit()
            .frame(height: 15)
            .foregroundColor(.gray)
    }

    private var textFields: some View {
        TextField(placeholder, text: $text)
            .focused($isFocused)
            .onChange(of: isFocused) { newValue in hasFocus = newValue }
            .onChange(of: text) { newValue in updateHandler(newValue) }
            .onSubmit { commitHandler(text) }
            .submitLabel(.search)
    }

    private var clearButton: some View {
        Button {
            text = ""
            clearButtonHandler?()
        } label: {
            Image(systemName: "xmark.circle.fill")
                .renderingMode(.template)
                .resizable()
                .scaledToFit()
                .frame(width: 15, height: 15)
                .foregroundColor(.gray)
                .padding(.trailing, 16)
        }
    }

    init(
        placeholder: String = "",
        text: Binding<String>,
        hasFocus: Binding<Bool>,
        updateHandler: @escaping (String) -> Void,
        commitHandler: @escaping (String) -> Void,
        clearButtonHandler: (() -> Void)? = nil
    ) {
        self.placeholder = placeholder
        self._text = text
        self._hasFocus = hasFocus
        self.updateHandler = updateHandler
        self.commitHandler = commitHandler
        self.clearButtonHandler = clearButtonHandler
    }
}
ContentView.swift
import SwiftUI

struct ContentView: View {
    @State var text: String = ""
    @State var hasFocus: Bool = false

    var body: some View {
        VStack {
            SearchTextField(
                placeholder: "キーワードを入力してください",
                text: $text,
                hasFocus: $hasFocus,
                updateHandler: { _ in },
                commitHandler: { _ in }
            )
            Text(text)
                .padding()
        }
        .padding()
    }
}
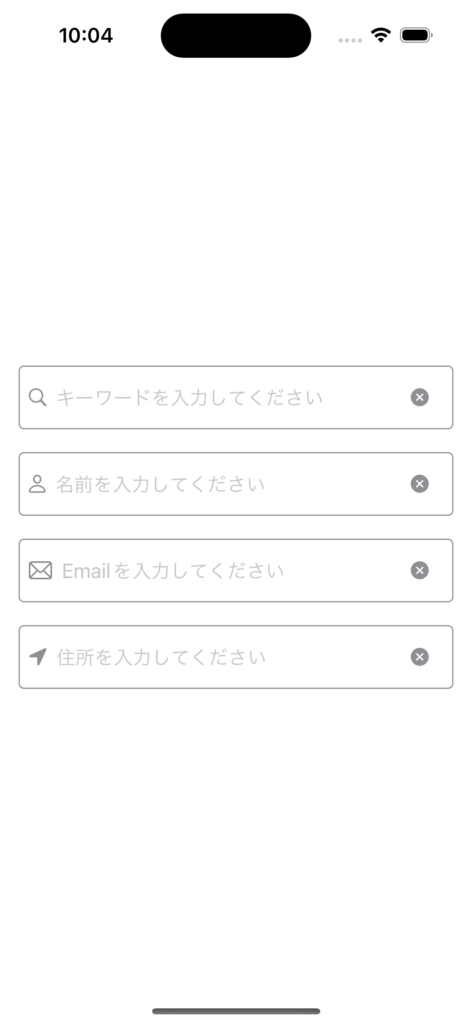
【カスタマイズ例1】アイコンを設定する
次に左のアイコンをカスタマイズする例を紹介します。

さっきのSearchTextFieldにIconTypeを設定し、それに合わせて表示するアイコンを変えるようにします。
SearchTextField.swift
struct SearchTextField: View {
		// 検索バーに表示するアイコンを設定する列挙型
    enum IconType {
        case search
        case person
        case email
        case address

        var icon: Image {
            switch self {
            case .search:  return Image(systemName: "magnifyingglass")
            case .person:  return Image(systemName: "person")
            case .email:   return Image(systemName: "envelope")
            case .address: return Image(systemName: "location.fill")
            }
        }
    }

    private let iconType: IconType
    @Binding private var text: String
    private let placeholder: String
    private let updateHandler: (String) -> Void
    private let commitHandler: (String) -> Void
    private let clearButtonHandler: (() -> Void)?
    @Binding var hasFocus: Bool
    @FocusState private var isFocused: Bool

    var body: some View {
        HStack {
            icon
            textFields
                .frame(height: 52)
            clearButton
        }
        .padding(.trailing, 4)
        .padding(.leading, 8)
        .overlay {
            RoundedRectangle(cornerRadius: 4)
                .stroke(.gray, lineWidth: 1)
        }
    }

    private var icon: some View {
        iconType.icon
            .renderingMode(.template)
            .resizable()
            .scaledToFit()
            .frame(height: 15)
            .foregroundColor(.gray)
    }

    private var textFields: some View {
        TextField(placeholder, text: $text)
            .focused($isFocused)
            .onChange(of: isFocused) { newValue in hasFocus = newValue }
            .onChange(of: text) { newValue in updateHandler(newValue) }
            .onSubmit { commitHandler(text) }
            .submitLabel(.search)
    }

    private var clearButton: some View {
        Button {
            text = ""
            clearButtonHandler?()
        } label: {
            Image(systemName: "xmark.circle.fill")
                .renderingMode(.template)
                .resizable()
                .scaledToFit()
                .frame(width: 15, height: 15)
                .foregroundColor(.gray)
                .padding(.trailing, 16)
        }
    }

    init(
        iconType: IconType,
        placeholder: String = "",
        text: Binding<String>,
        hasFocus: Binding<Bool>,
        updateHandler: @escaping (String) -> Void,
        commitHandler: @escaping (String) -> Void,
        clearButtonHandler: (() -> Void)? = nil
    ) {
        self.iconType = iconType
        self.placeholder = placeholder
        self._text = text
        self._hasFocus = hasFocus
        self.updateHandler = updateHandler
        self.commitHandler = commitHandler
        self.clearButtonHandler = clearButtonHandler
    }
}
【カスタム例2】フォーカスすると出現する
次に検索バーにフォーカスがあると、入力欄が出現する例を紹介します。
動画だとアニメーションが微妙ですが、実際に手元で動かすと綺麗にアニメーションすると思います。
SearchTextFieldWithAnimation.swift
struct SearchTextFieldWithAnimation: View {
    @Binding private var text: String
    private let placeholder: String
    private let updateHandler: (String) -> Void
    private let commitHandler: (String) -> Void
    private let clearButtonHandler: (() -> Void)?
    @Binding var hasFocus: Bool
    @FocusState private var isFocused: Bool

    var body: some View {
            HStack {
                icon
                textFields
                    .frame(height: 50)
                clearButton
            }
            .padding(.trailing, 4)
            .padding(.leading, 8)
            .background {
                RoundedRectangle(cornerRadius: 4)
                    .stroke(.gray, lineWidth: 1)
                    .frame(minWidth: 50, minHeight: 50)
                    .contentShape(Rectangle())
                    .onTapGesture {
                        withAnimation {
                            hasFocus = true
                        }
                    }

            }
    }

    @ViewBuilder
    private var icon: some View {
        Image(systemName: "magnifyingglass")
            .renderingMode(.template)
            .resizable()
            .scaledToFit()
            .frame(width: 15, height: 15)
            .foregroundColor(.gray)
    }

    @ViewBuilder
    private var textFields: some View {
        if !hasFocus && text.isEmpty {
            EmptyView()
        } else {
            TextField(placeholder, text: $text)
                .focused($isFocused)
                .onChange(of: isFocused) { newValue in hasFocus = newValue }
                .onChange(of: text) { newValue in updateHandler(newValue) }
                .onSubmit { commitHandler(text) }
                .submitLabel(.search)
                .frame(maxWidth: hasFocus || !text.isEmpty ? .infinity : 0)
        }
    }

    @ViewBuilder
    private var clearButton: some View {
        if !hasFocus && text.isEmpty {
            EmptyView()
        } else {
            Button {
                withAnimation {
                    text = ""
                }
                clearButtonHandler?()
            } label: {
                Image(systemName: "xmark.circle.fill")
                    .renderingMode(.template)
                    .resizable()
                    .scaledToFit()
                    .frame(width: 15, height: 15)
                    .foregroundColor(.gray)
                    .padding(.trailing, 16)
            }
        }
    }

    init(
        placeholder: String = "",
        text: Binding<String>,
        hasFocus: Binding<Bool>,
        updateHandler: @escaping (String) -> Void,
        commitHandler: @escaping (String) -> Void,
        clearButtonHandler: (() -> Void)? = nil
    ) {
        self.placeholder = placeholder
        self._text = text
        self._hasFocus = hasFocus
        self.updateHandler = updateHandler
        self.commitHandler = commitHandler
        self.clearButtonHandler = clearButtonHandler
    }
}
まとめ
今回はSwiftUIで検索バーを自作する方法とカスタマイズ例を紹介しました。
UISearchBarを使えないのは少々不便ですが、SwiftUIでもそれっぽいのを作ることはできます。
ぜひご自身の手で色々と試してみてください。
ここまでのご閲覧ありがとうございました!
今回のコードはGitHubに挙げています。興味がある人はぜひ覗いてみてください。
GitHub - Yuzuki0709/SampleSearchBar
Contribute to Yuzuki0709/SampleSearchBar development by creating an account on GitHub.


コメント